How do you install a cedar roof?
Cedar roofs have become more popular over the years because of their strength and aesthetic appeal. The material is resilient and can withstand heat, rain, snow, hail, and other such weather conditions. It can last longer than most roofing materials, especially if it’s installed correctly. At Emerald Cedar Contracting, we use the process mentioned below to install a cedar roof securely.
1. Removing the Old Roof
Our first step is to remove the old roof carefully and meticulously. We make sure the underlayment isn’t damaged during the removal process. Once the old shingles are completely removed, our installers will examine the underlayment for damage like leakages, rot, and poorly installed components. If there are any problems, we’ll repair or remove them before we install the new roof on the surface.
2. Choosing the Right Options
Cedar roofs are surprisingly versatile and offer a number of options. Before you install the roof, discuss your options with your contractor and consider their recommendations. Here’s a brief description of the choices available to you:
Type of Wood – You can choose between Alaskan Yellow Cypress or Western Red Cedar. The former is paler and will age to take on a silvery-gray hue. This color lends your home a more beach-like vibe. The Western Red Cedar fades into a brown, earth-toned hue that looks very vintage and rugged. Alaskan Yellow is more durable and resilient of the two.
Shingle Type – There are two types of shingles for you to choose from. Perfection shingles have 3/8” butt and look thinner and flatter on the room. Tapersawn shingles have a butt of around 5/8” to 7/8”, so they’re thicker. Tapersawn shingles are more resilient and durable but Perfection shingles can wear down quickly.
The Placement – The shingles can be installed evenly or in a staggered position. Both are good options, but the staggered installation will give your roof a more textured appearance.
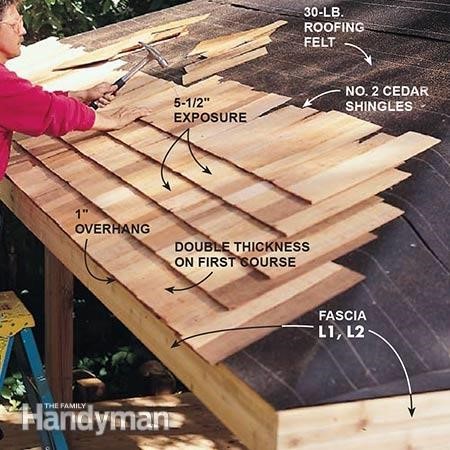
3. Installation Process
After the old roof is removed, our technicians will hand nail all the singles into position carefully. We use stainless steel nails to anchor the shingles in the right position. If the nails are placed too close to the top of the shingle, it won’t support the material well and eventually your roof will become damaged. We’ll also make sure there’s ample space and venting to allow the wood to breathe.
If you want to know more about cedar siding, don’t hesitate to contact us at Emerald Cedar Contracting. You can fill in this contact us form and request a call back from us.